How to set up the Facebook Pixel using Google Tag Manager.
Recently I was tasked to deploy a Facebook Pixel on an ecommerce site. While deploying tags with Google Tag Manager is normally a relatively straightforward thing to do, I found the documentation around Facebook’s Pixel to be sub-par, a bit confusing, and in need of improvement. So I decided to write this guide both to help out those readers who are perplexed about the how to deploy the pixel, as well as spill some digital ink critiquing the FB Pixel documentation.
Also, I very humbly have found that this blog listed in “top analytics blogs” type articles, oftentimes with a caveat that “Analytics Ninja doesn’t write very often, but when he does….” A blog post from yours truly was well overdue, and I wouldn’t mind boosting up this site’s SEO as a result (Google being all keen on fresh content and such). Feel free to link to this post with an anchor-text rich “do follow” text. Maybe something like [Google Tag Manager Consultant]. You’ll be helping me cover the costs of raising 5 kids. 🙂
So, here we go….
Step 1 – Create a Facebook Pixel
Once you click the create pixel button, you’ll need to give your pixel a name and agree to Facebook’s Pixel Terms. As an informed reader, I went through the TOS that they have on their pixel pretty in depth and I still don’t really fully understand what’s going on in terms of the data they collect. As with most things in the modern digital advertising world, you basically accept that Facebook is probably going to track as much as they can via their pixel and hoard all of that data so that they can build better advertising algorithms for to make as much money for the company as possible. Facebook, like Google, is in many ways primarily a Big Data company whose largest strategic business asset is data. Indeed, the Facebook data set is really second to none because of the nature of the personal information that is given to them freely by almost 2 BILLION people.
One additional point about the Facebook Pixel which makes me raise my eyebrows is the following quote from their Help Center. “To improve your ads delivery, how Facebook measures the results of your ads, and in an effort to enhance the relevancy and usefulness of ads, we’re enhancing the Facebook pixel. The Facebook pixel will start sending more contextual information from your website to better understand and categorize the actions that people take on your site to optimize for ads delivery.
The additional information sent through pixel will include actions on your page, like “add to cart” or “purchase” clicks, and will also include information from your page’s structure to better understand context associated with these actions.”
Facebook then makes you dig into their developer docs to get an understanding of the impact of that statement. Because marketers are
A). Going to dig into developer docs and understand what they mean and
B). stop using the Facebook pixel because it is collecting too much information or
C). update their code to opt out of the data collection. PLEASE somebody remind me to update this post with an explanation of what this *really* means on a technical level once we can start inspecting hits to the FB servers. My guess is that FB is going to collect a HUUUGE amount of information about every click on the site. Kinda like Heap Analytics auto-tracking without providing the end-user access to the data.
To quote my own tweet:
Oh, so it looks like Facebook is about to auto-track the crap out of **everybody.** https://t.co/kEv3dcWQZ9 cc: @AureliePols pic.twitter.com/L3pz7UN9Og
— Yehoshua Coren (@AnalyticsNinja) April 27, 2017
Click data and page metadata? And you need to add a “set” command to your code if you don’t want to provide that info? Wow! To be honest, I’d love to be a part of that analytics team that has access to that much data just gobbled up from so many websites. If you’re listening, Facebook, for $220,000/yr I’d consider joining your team.
But I digress…
Step 2 – Install Your Pixel Code
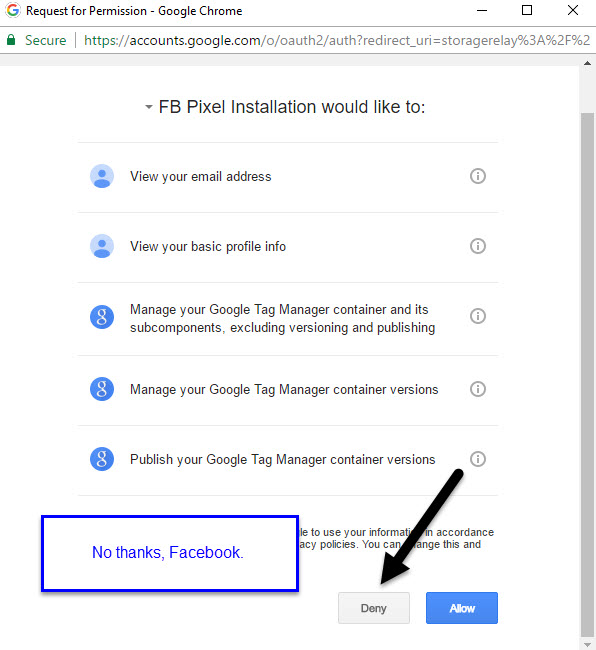
As a part of the process for installing the pixel, you can give Facebook access to GTM via API and they’ll create a tag and trigger for you. Let’s “not” do that, and install the tag manually so that we have more control over configuration.
Facebook gives you all of the steps needed to install their vanilla tag in GTM. One step that I’m going to stop at and explain in some further depth is that “advanced matching feature”. This is an option you can toggle when grabbing your code. Advanced matching allows you to pass Personally Identifiable Information to Facebook so that they can know exactly who is on your website for the purposes of improved retargeting.
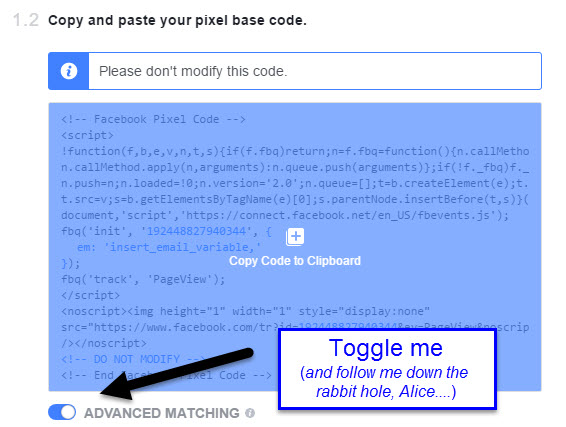
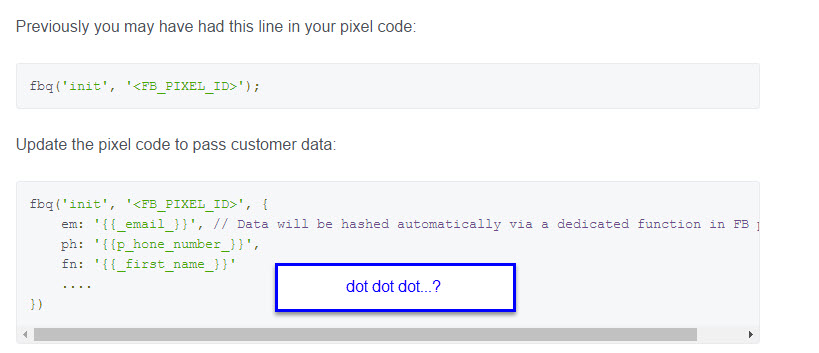
In their own words, “This new feature of the Facebook pixel enables advertisers to leverage their own customer data such as email address, phone number, and so on. By implementing this feature, advertisers can report on more conversions, optimize their ads against more conversion data, and reach more people on Facebook with their website custom audiences or dynamic ads”. I found it a bit hard to find information about which fields were valid in the init function because the article that references the advanced matching just references a dot dot dot
Which brings us to:
Step 3 – Configuring your Facebook Pixel Initialization
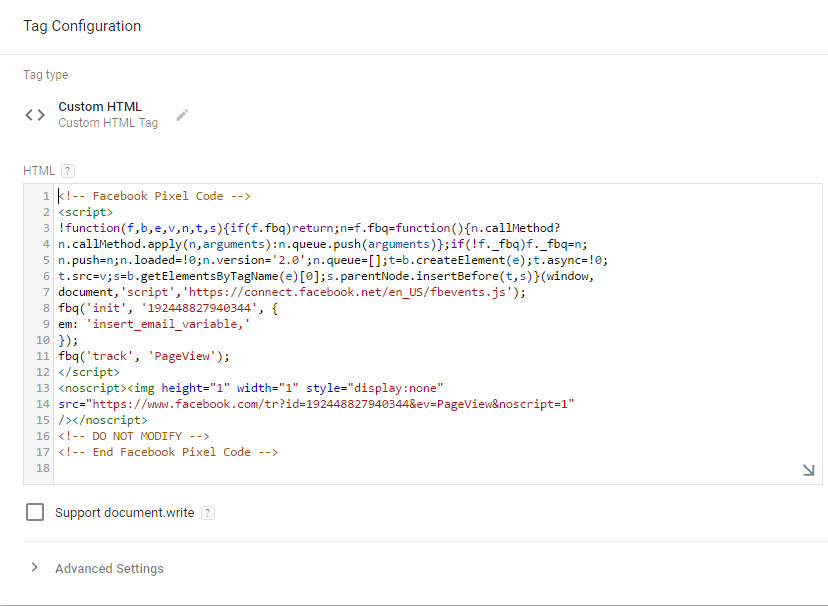
The first step that most users following the directions provided in Facebook will do is copy and paste their pixel into a Custom HTML tag. It will look something like this.
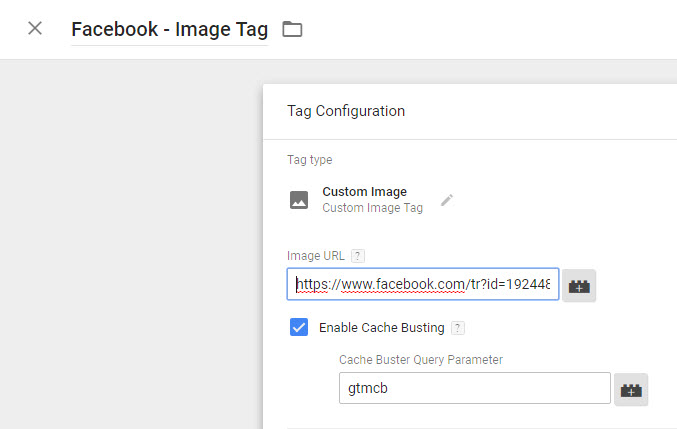
There are a few things that I want you to note about this code sample. First of all, it includes comments in it, which for the purposes of Google Tag Manager are completely unnecessary. GTM strips out those comments when it injects the script anyways and indicating where the code ends or “do not modify” doesn’t add any value to this tag, IMHO. Second, the tag includes a “noscript” component. Noscript means that if javascript is disabled in the browser, an image pixel would be loaded directly via GTM’s noscript iframe. However, noscript tags will not fire within a Custom HTML tag. IF you really want to have the Facebook Pixel fire in a javascript disabled browser, you’ll need to load this within a custom image tag.
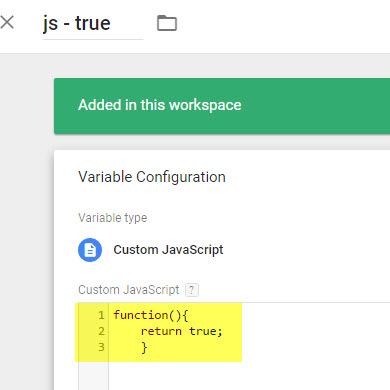
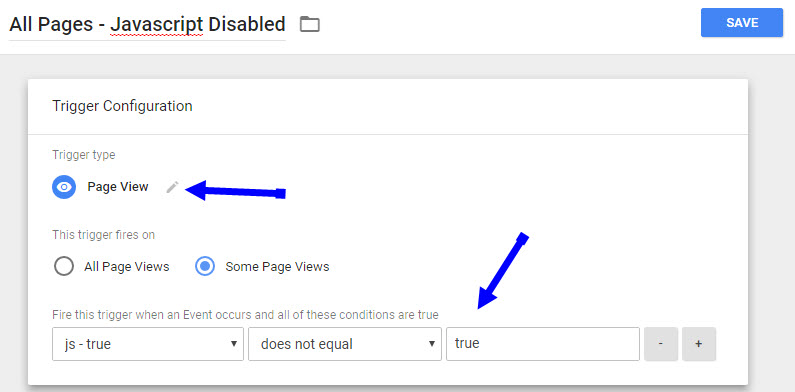
The cleanest trigger for this image tag is to fire on all pages when javascript is disabled in the browser. The simplest way to determine if javascript is disabled is to have a Custom Javascript variable that returns true. If the value in the variable does not equal true (because if javascript is disabled it will be returned as undefined), then fire the image tag.
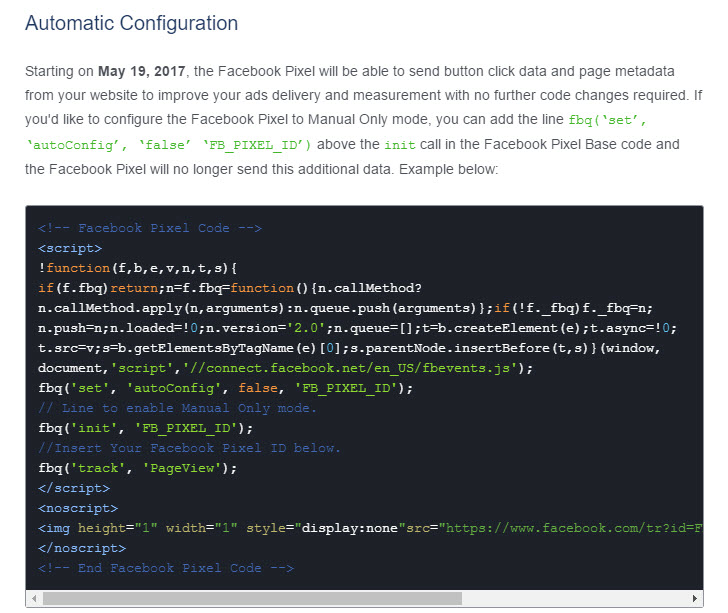
Let’s proceed to the setup of the Facebook Pageview javascript tag. For starters, IF you want to want to block the click tracking that Facebook will deploy on May 19, then you’ll need to use a set command to turn it off before the ‘init’ method is called.
fbq('set', 'autoConfig', false, '{{Constant - Facebook Pixel ID}}');
//using a constant string variable in the Custom HTML Tag
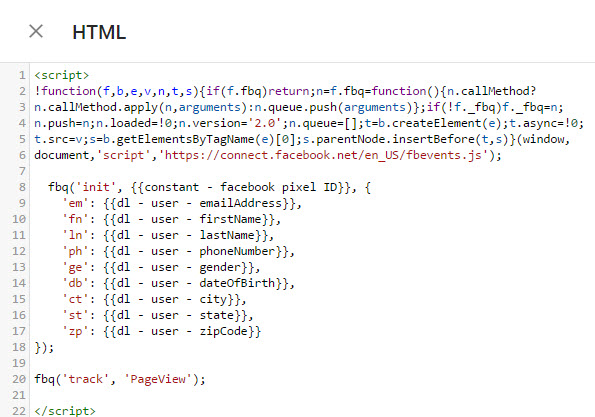
Next, we’ll want to set up the Advanced Matching as these need to be configured as a part of the init method. The valid values, which all must be in lowercase, are:
- em –> email address
- fn –> first name
- ln –> last name
- ph –> phone number
- ge –> gender
- db –> date of birth
- ct –> city
- st –> state
- zp –> zip code
Your Facebook Pixel will now probably look something like this:
As opposed to the Google Analytics which allows you to use multiple pixel IDs (i.e. property IDs) and creates an array of tracker objects that will manage to which pixel ID data gets sent, Facebook does not support this. I find this to be perplexing because I’ve come across quite a number of use cases where a company would want to have more than one Facebook Pixel on a page. From what I can tell, if you constantly initialize the FB Pixel with a new Pixel ID before your track command, you’ll be able to effectively manage multiple pixels on a page. But the Facebook Pixel helper will throw errors.
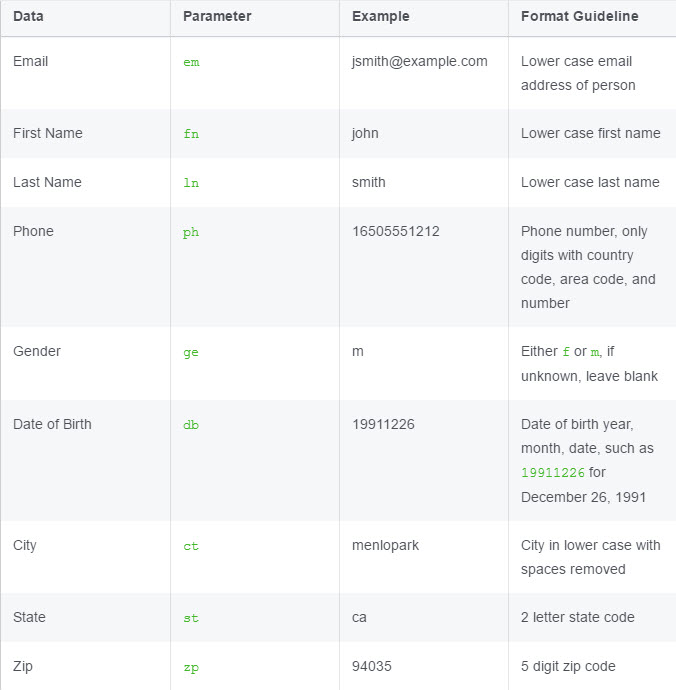
It is critical to keep in mind that the Facebook Pixel has very specific requirements for how those values can be sent. As such, probably all of the values that you would potentially have available in your dataLayer will need some form of transformation as it is doubtful that your dataLayer is formatted by default in accordance to Facebook’s requirements (why would it be?).
TL;DR – more work for your developers. Here is an example for a custom javascript variable used to return the user’s first name in lowercase characters:
function(){
	return {{dl - user - firstName}}.toLowerCase()
	}
As for the formatting guidelines for the Advanced Matching settings as a part of your Facebook Pixel INIT:
Lastly, we’re going to want to make sure that Facebook Pixel javascript has loaded completely before calling any additional methods, known as Custom Events.
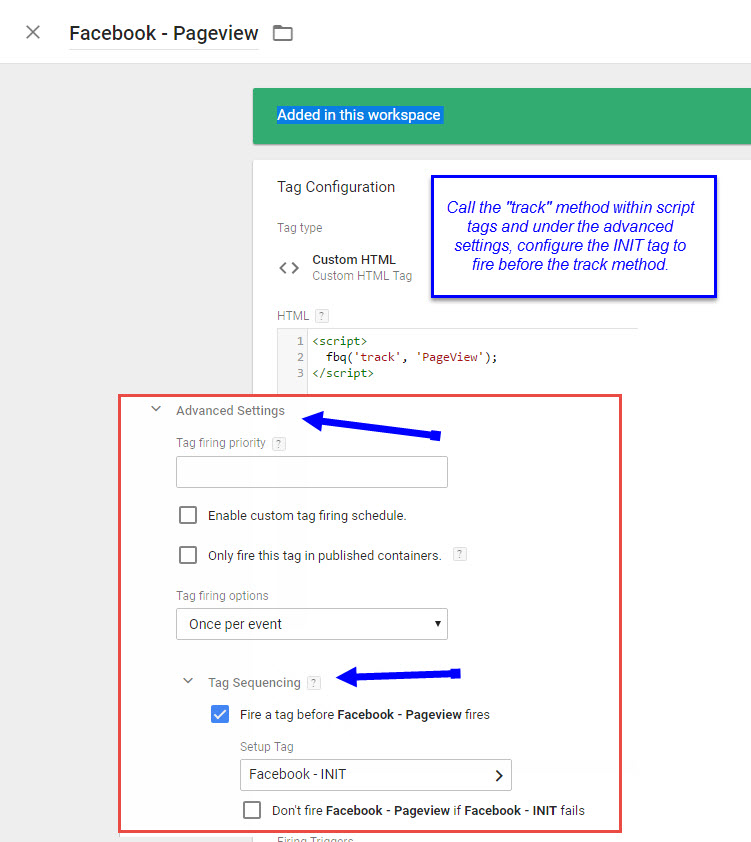
Run the init tag before any “track” method as a setup tag.
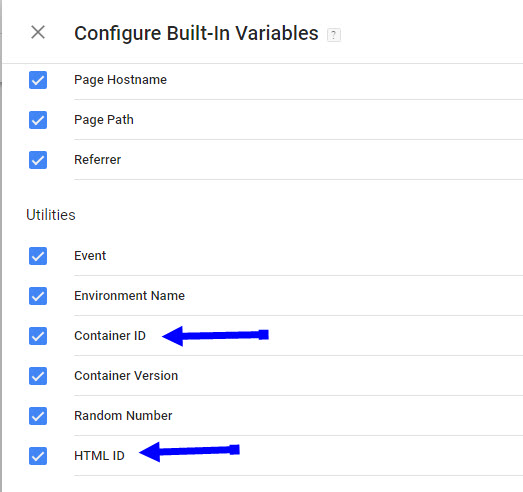
With this approach, we’re going to create separate tags for any of “track” method called, discussed in full detail below. To make this work, you’ll need to make sure that you have 2 built in variables enabled in your container, namely the {{Container ID}} and {{HTML ID}}.
Within your Custom HTML tag, you’ll add the following line.
window.google_tag_manager[{{Container ID}}].onHtmlSuccess({{HTML ID}});
The final code output will be something like this:
Now you can reference this tag before any Facebook track method. If you want to fire your pageview tag, then invoke it in the following way:
The reason that you’ll want to run the Init Tag as a setup tag is because the majority of Custom Events you’re going to want to fire will not be fired on an “All Pages” rules AND you want to be sure that fbevents.js files has loaded.
Step 4 – Create Tags for Standard Events
Facebook supports 9 standard events as a part of the javascript API. All events are called with the “track” method.
<script>
fbq('track','CaSE SenSitive EVENT NAME');
</script>
- ViewContent
- Search
- AddToCart
- AddToWishlist
- InitiateCheckout
- AddPaymentInfo
- Purchase
- Lead
- CompleteRegistration
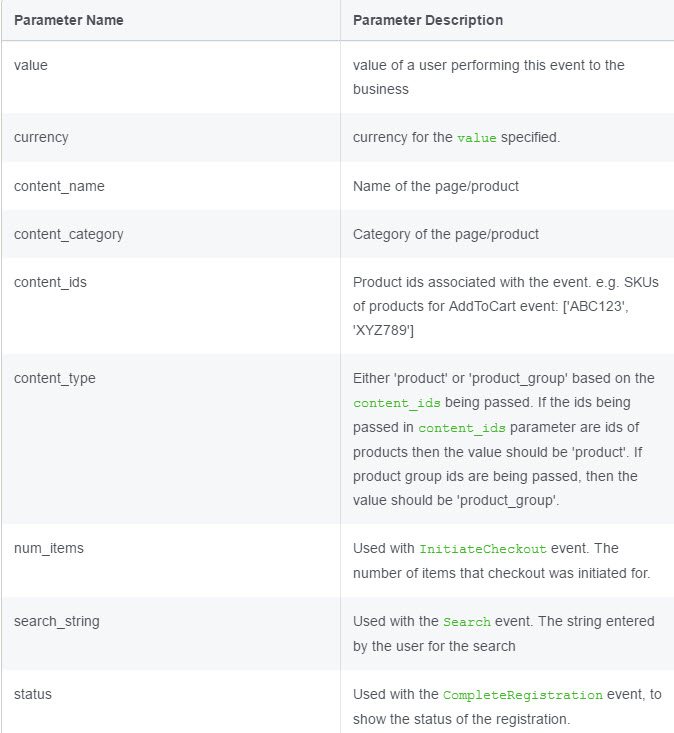
The Standard Events support Custom Data. There is a set schema for which Custom Data parameters are available for which Standard Events. The full list of Custom Data is:
Value
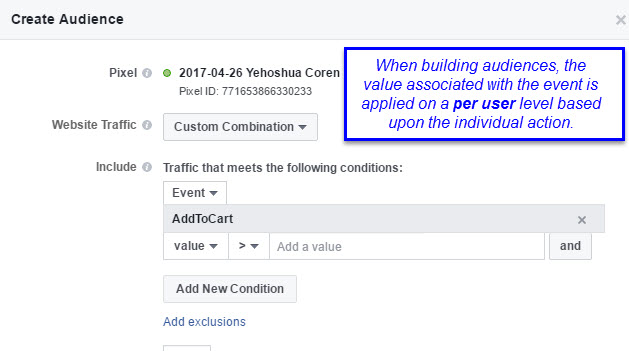
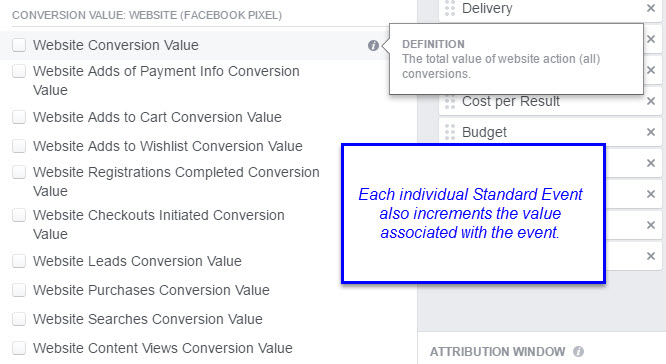
Exactly how the “value” field works in the FB Ads Manager was initially pretty unclear to me. If it is like ecommerce revenue in GA, then having a Value set for a wide range of different events does not make sense expect for actions that truly contain some form of economic value (including leads). If it is treated more as a descriptor (for example, the the price of a product on a details page), then having the value field on multiple events does make sense. So –> is “Value” a dimension or a metric? According to Facebook it is the “value of a user performing this event to the business). Sounds like a metric. Please leave a comment if you can confirm it is a metric / dimension, or both.
My current understanding is that the value is a dimension when being used to create audiences and it is metric when used in certain reporting.
IF you’re sending a value of a product on a product details pageview, then the “website conversion value” will be non-meaningful. However, FB does allow you to build custom reports where you can choose individual value metric, such as Add To Cart value. That’s pretty useful, imho.
Currency
Nothing to say here.
Content Name
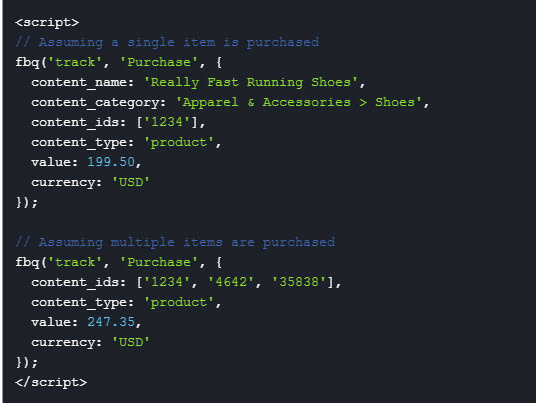
I don’t like the naming convention for this field very much. In an ecommerce situation, this would correspond to the Product Name. For a content site, it would simply be the page name. Since the content_name can describe products, I would like to know if sending an array is a valid field type. According to the documentation, that does not appear to be the case.
Notice how content_name was left out of their example if you purchase more than one product. #meh.
We’ll get to examples of adding customData to Standard Events shortly….
Content Category
Similar to content name, the documentation suggests that arrays are not valid field types and therefore the field looses utility when it comes to measuring ecommerce. While the parameter description in the documentation is simply “Category of the page/product”, the examples do suggest that hierarchical structure is supported. In other words, you can use a > delimiter to denote categorical taxonomy thought I don’t believe that Facebook parses that hierarchy into meaningful reports (someone correct me if I’m wrong).
Content IDs
Facebook says that these are product specific, though I don’t see any reason why an articleId would be invalid here. This is the only field I know of where an array is the expected value of the field. Note to Facebook: in your table of Parameter Names and Descriptions, please include a column for Type.
Content Type
Again, a field specific to ecommerce yet the name is “content”. Valid values are “product” or “product_group”. I suppose that the field is meant to differentiate between Product Detail and Product Category pages. Honestly, I’ve read parameter description 50 times and I’m not exactly sure what they mean by “product group ids” (and I’m not a newbie when it comes to ecommerce).
Number of Items
Used ONLY in the InitiateCheckout event. It seems to me that this value is the same as [content_ids].length (in other words, the number of items listed in the array of content_ids). If so, then why does this field exist and why does it exist only for the InitiateCheckout event? If this field is really the same thing as “quantity”, then why is it only used in the Initiate Checkout event and not in other ecommerce events? I have no good answers for those questions. I treat the field as a deduplicated number of unique items, not as a quantity field.
Search String
If I wrote this blog in the same style as the deluge of thin content out there on the internet that I have to wade through, I’d say:
“According to Facebook, the search_string is used with the Search event. It is the string entered by the user for the search. For example, if you went to a “website” and searched for “really cool white tuxedos with blue trim”, then your “search_string” would be “really cool white tuxedos with blue trim”. According to Facebook, this will enhance your engagement and FBROIAAS (Facebook Return On Investment And Ad Spend) by an unspecified amount.”
Status
This is used as a part of the CompletedRegistration event. Since the docs don’t say anything about expected values, my spidey-sense tells me that this is likely used for measuring progression through in an SaaS business model. Alternatively, it could be used simply to denote what type of registration it was (Free, Paid, Super Fly).
Putting custom data together with standard events in GTM
For the purposes of this blog post, I’m going to copy code examples from the Facebook documentation so that you’ll have it all in front of you one place here. Remember, you’ll have the INIT tag fire as a set up tag, and each of the following would be examples of Custom HTML. This code is going to assume that all of the values that are dynamic you are passing into the HTML tag are present in your dataLayer. I’m adding dummy names for the variables based upon naming convention that I tend to use.
/*
The search event should be placed on any search results page to track when people complete a search. Add a search string parameter or product and content details to track and optimize for specific search terms and products.
*/
<script>
fbq('track', 'Search', {
	search_string: {{searchTerm}},
	content_ids: {{facebook - productArray}},
	content_type: 'product'
});
</script>
/*
The view content event should be placed on any content or product detail pages to track when people visit. Add parameters for product and content details to track and optimize for specific products, and for conversion value (amount per content view) and currency to measure the value of content view conversions.
*/
<script>
fbq('track', 'ViewContent', {
	content_ids: {{productSKUs - array}},
	content_category: {{productCategory - delimited}},
	content_type: 'product',
	value: {{productPrice}},
	currency: {{currencyCode}}

});
</script>
/*
The add to cart event should be triggered when a person adds an item to a shopping cart on your website. Add parameters for product details to track and optimize for specific products, and for conversion value (amount per content view) and currency to measure the value of add to cart conversions.
*/
<script>
fbq('track', 'AddToCart', {
	content_ids: {{productSKUs - array}},
	content_type: 'product',
	content_name: {{productName}}, //for single item
	value: {{productPrice}},
	currency: {{currencyCode}}
});
</script>
/*
The add to wishlist event should be triggered when a person adds or saves an item to a wishlist on your website. Add parameters for product details to track and optimize for specific products, and for conversion value (amount per content view) and currency to measure the value of add to wishlist conversions.
*/
<script>
fbq('track', 'AddToWishlist', {
	content_ids: {{productSKUs - array}},
	content_category: {{productCategory - delimited}},
	content_name: {{productName}}, //for single item
	value: {{productPrice}},
	currency: {{currencyCode}}
});
</script>
/*
The initiate checkout event should be triggered when a person enters the checkout flow on your website.
*/
<script>
fbq('track', 'InitiateCheckout', {
	content_ids: {{productSKUs - array}},
	content_category: {{productCategory - delimited}},
	content_name: {{productName}}, //for single item
	value: {{productPrice}},
	currency: {{currencyCode}},
	num_items: {{js - numberOfItems}}
});
</script>
/*
The add payment info event should be triggered when a person adds payment information to an account or in a checkout flow.
*/
<script>
fbq('track', 'AddPaymentInfo', {
	content_ids: {{productSKUs - array}},
	content_category: {{productCategory - delimited}},
	value: {{productPrice}},
	currency: {{currencyCode}}
});
</script>
/*
The purchase event should be placed on an order confirmation page or be triggered from a complete order button, indicating that a person has purchased a product. Add parameters for product details to track and optimize for specific products, and for conversion value (amount per content view) and currency to measure the value of purchase conversions.
*/
<script>
fbq('track', 'Purchase', {
	content_ids: {{productSKUs - array}},
	content_name: {{productName}}, //for single item
	content_type: 'product',
	value: {{productPrice}},
	currency: {{currencyCode}},
	num_items: {{js - numberOfItems}}
});
</script>
/*
The lead event should be placed on a form confirmation page or triggered by a submit button when a lead form is completed (ex: when someone signs up for a newsletter). Add parameters for conversion value (amount per content view) and currency to measure the value of lead conversions.
*/
/*
The lead event should be placed on a form confirmation page or triggered by a submit button when a lead form is completed (ex: when someone signs up for a newsletter). Add parameters for conversion value (amount per content view) and currency to measure the value of lead conversions.
*/
<script>
fbq('track', 'Lead', {
	content_name: {{contentName}},
	content_category: {{contentCategory}},
	value: {{leadValue}},
	currency: {{currencyCode}}
});
</script>
/*
The complete registration event should be placed on a registration form confirmation page or triggered by a submit button when a registration form is completed (ex: when someone subscribes to a service). Add parameters for conversion value (amount per content view) and currency to measure the value of complete registration conversions.
*/
<script>
fbq('track', 'CompleteRegistration', {
	content_name: {{contentName}},
	status: {{status}},
	value: {{leadValue}},
	currency: {{currencyCode}}
});
</script>
Step 5 – Create Tags for Custom Events
I love Custom Events. This is something that Facebook totally nailed and adds a tremendous amount of flexibility and power to the data collection on their platform. In short, you can send any event name you want and any number of key/value combinations you want. Basically, they created an ability to push your entire dataLayer to their platform.
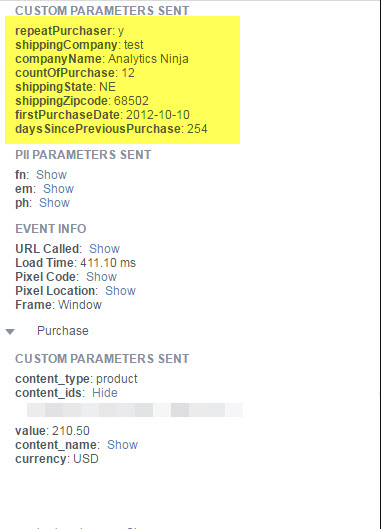
Custom Events can be used for Custom Conversions as well as Audience Building. When I was finishing up the client’s FB Pixel project that was the catalyst for this blog post, I stumbled upon the ability to allow them to create audiences based upon any and all customer data that they already have. Check out the results from the Facebook Pixel Helper:
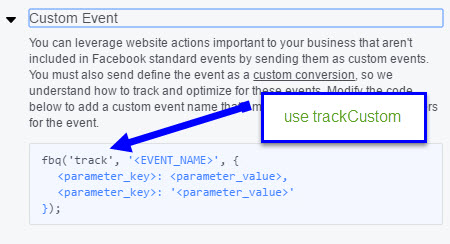
There are two areas in the Developer Docs which mention Custom Events, and they don’t agree with each other. I’ve deployed using the “trackCustom” method and it works, so I recommend sending Custom Events as “trackCustom” instead of just using a “track” method.
Wrapping Up
While I had a lot of fun deploying a Facebook Pixel with all the bells and whistles for my client (which translated into excellent conversion tracking and audience creation capability for their business), I was relatively annoyed and frustrated by a lack of clarity from the Facebook Developer Docs. I hope that you enjoyed this article and please feel free to comment down below.



Leave a Reply